


Imagine if old-timey pirates sailing the open seas had a Starlink. Adventures would have been a lot shorter.
But they’d probably still have the same questions boaters have.
How do I keep my Starlink safely on my boat? Which version of Starlink is best? Should I buy one of those fancy Starlink boating internet packages? (And yeah, sure, where exactly is Davy Jones' locker?)
If you’re curious about the best Starlink for your boat, or if you’re wondering how to keep your Starlink safe and sound while out in the elements, read on!
Does Starlink work on boats?

You bet it does!
Boaters are one of the largest benefactors of space-based wifi, which uses low-Earth orbit (LEO) satellites to bring you the internet far away from land. Older satellite-based internet services only gave boaters internet with ~600ms of latency, compared to Starlink’s consistent 25-50ms latency. (For reference, latency refers to the amount of the time it takes for signal to go up to the sky toward a satellite, and then return. Less is better.)
If you haven’t tried it yet for yourself, you can rest easy knowing that many people have trailblazed the internet on the open-waters for you!
Please keep in mind that no Starlink tier should be considered an official substitution for access to satellite emergency communications, such as a SOLAS-certified handheld VHF radio.
Protip: if you’re curious to join online boating communities, there are tons of places people talk about their firsthand experiences, including getting wifi.
Which Starlink model should I get for my boat?
There are a lot of confusing internet options out there (as if boaters don’t already have a lot to figure out).
Practically, you’re more than likely going to be deciding between the Starlink Mini and a Standard Gen 3 or Gen 4 Starlink. (And there’s also the Performance Model Starlink which might come into play — more on that way later.)
| Feature | Starlink Mini | Standard Starlink |
|---|---|---|
| Size | Compact, portable | Larger dish + router |
| Power Draw | Low (~20–40W) | Higher (~50–75W+) |
| Performance | Moderate speeds | Higher peak speeds |
| Portability | Excellent | Limited |
| Marine Suitability | Ideal for small boats | Better for large vessels |
Sure, there is a little bit of a price difference — putting the price into writing is a bit tricky, since the package you get is location dependent, and there are constant sales and packages, though a Standard Starlink tends to run MSRP $349, compared to $249 for the Starlink Mini. (You can often get deals on either one of them if you search though.)
But which one you need for your boat really has more to do with whether you are on a small speedboat, or say, a yacht.
And in most cases, I genuinely recommend the Starlink Mini.
Here’s why.
Starlink Mini vs Starlink Standard for Boats
Starlink Specs
| Attribute | Starlink Mini Kit (4th Gen) | Starlink Standard Kit (Gen 3) |
|---|---|---|
| Dish type | Flat panel, compact | Flat panel, larger phased array |
| Dimensions (approx) | ~11.4 × 10.2 in. (very compact) | ~23 × 15 in. |
| Weight | ~2.5 lbs. (≈1.1 kg.) | ~7–9 lbs. (≈3–4 kg.) |
| Portability | Backpack-sized, travel-ready | Semi-portable, designed for fixed installs |
| Power consumption | ~20–40W | ~50–75W (higher peak) |
| Power input | Native DC (vehicle-friendly) | AC (with power supply) |
| Router | Built-in (dual-band Wi-Fi) | External Wi-Fi 6 router (tri-band in newer kits) |
| Max download speed | ~100+ Mbps | ~200–250+ Mbps |
| Field of view / antenna | Smaller array | Larger phased array → better signal capture |
| Weather resistance | Outdoor rated | Outdoor rated (more robust mounting options) |
| Cabling | Integrated / simplified | Separate dish + router cabling |
It’s pretty clear just by looking at the two that a standard Starlink mount is more of a thing.

Starlink Mini (left) and the Starlink Gen 3 Standard (right) - OVRMag.com
Depending on what you need to do while out on the water, it can actually be pretty tempting to choose a Standard Starlink, despite its bigger size: it’s got faster speeds, better wifi capabilities (external wifi 6, compared to the internal wifi 5 of the Mini), and is seemingly more sturdy. All of that might fit your needs.
But for boaters, the real reason the Starlink Mini shines is due to its power consumption, or lack thereof.
Standard Starlink dishes take between 75-100 watts to run, on average. (That’s actually quite a lot of juice for one thing!)
Not only that, but they require AC power, which means you need an inverter. That’s an additional ~30-50 watts just from that, on average. On a weekend cruiser? Not great. But solutions exist! For example, the Gen 3 Standard can also run from our 12v Power Supply.
Because this may not be a huge deal if you’re in a house, but if you’re running solar power or using precious battery power, the high amount from the standard Starlink will drastically upend your power supply on a small rig. (Though if you’re on a Walt Disney cruise, maybe not so much.)
What about the Starlink Mini’s power profile? That generally only uses ~20-40 watts under regular conditions. (Traditionally, that’s basically mini-fridge amounts of power.)
Plus, the Mini runs on DC power, meaning you can plug it straight into your portable power supply, forgoing that additional inverter. As long as you have a large lithium battery onboard, you’re good to go with the Starlink Mini, in most cases.
Starlink Dish Speed Comparison
What about the internet quality out on the sea, though?
| Speed Metric | Starlink Mini | Starlink Standard (Gen 3) |
|---|---|---|
| Typical download | ~50–150 Mbps | ~100–220 Mbps |
| Peak download | ~100–260 Mbps | ~220–400 Mbps |
| Typical upload | ~5–15 Mbps | ~10–20 Mbps |
| Latency | ~30–60 ms | ~20–40 ms |
The standard Starlink dishes are going to be roughly 25-50% faster, and in idealized settings, sometimes even more (~100 Mbps download speed on average for the Mini, versus ~160 Mbps on average for the Standard).
Yet realistically, the speeds of the Starlink Mini allow for more than adequate speeds of most things. Streaming Netflix, video conferencing, and your casual doomscrolling are all roughly within the neighborhood of ~50 Mbps upload/download activities.
This all means that in most real-world scenarios, the speed differences should be negligible, whereas the power differences on the majority of boating rigs might be huge.
With that in mind, the bigger thing to consider is your data plan!
What Starlink internet packages exist for boating?
First, know that Starlink offers four main internet subscription tiers with your dish (and a few sub-types within a few of them):
- Residential
- Roam (with variants, including “50GB,” “Unlimited,” “Regional,” and “Global”)
- Maritime (business-tier plans with data buckets)
- Business / Priority Tier (fixed site)
You’re setting out to water, so it’s easy to look at that list and think, “Oh, I probably need the Maritime package!” The thing is, not necessarily. In fact, not even likely.
As a boater, you will almost certainly need to at least have the “Roam” tier, if in fact your boat will be moving. (That just makes sense.) For me, I use the Roam Unlimited Plan.
Protip: Starlink’s website has a quick and easy tool for seeing what your prices and options will be. There is also frequently a 30-day trial for you to test how it works out for yourself.

In general, Roam pricing works similar to picking a cell phone plan:
- Limited data plans (e.g., 50GB, 100GB)
- Unlimited plans
- Regional vs. Global variants
That means how much you pay for Roam will vary by market and promotions you can bag, but you can expect to pay roughly ~$75-$150 a month, maybe a little less, maybe a little more.
The “Maritime” package on the other hand, is an always-on offshore plan with priority data streaming, not to mention a corresponding (and mandatory) “Performance” hardware. (And the cost reflects that!)
Before breaking down that Maritime tier further, let’s consider where you’re going to be boating.
Nearshore vs Offshore performance
For any territorial sea, basic boating, you’re likely going to remain what’s considered “nearshore”.
In case you’re rusty (or new!):
- Nearshore (0–12 nautical miles, or <13.8 miles or 22.2 km)
- Offshore (12+ nautical miles, or >13.8 miles/22.2 km)
As long as you’re about 13 miles from shore, which is the majority of all boating scenarios, a Starlink Roam plan will work just great.
It’s only when you start to get to what we call “high seas”, otherwise known as “international waters” that you will need to consider Starlink’s Maritime plan. So if you’re a marine biologist studying ocean life 500 miles away from land, keep reading.
What is Starlink’s ‘Maritime’ package?
Maritime is basically an expensive, business-tier package for vehicles that go out into or near the ocean, or similarly far away.

Though pricing may vary, you will pay a minimum of $250 a month, plus $1,999 for the Performance Kit hardware.

Maritime Service Plans
- 50 GB - $250/mo
- 500 GB - $650/mo
- 1 TB - $1,150/mo
- 2 TB - $2,150/mo
This is also a tier where you’re going to be put into contact with Starlink’s customer service reps, and which takes 6-8 weeks for delivery for your special dish. If you are using this tier, you are almost certainly a business, not joyriding around the bay on a sunday afternoon.
What if I go farther than 13.8 miles on my Roam plan? (Ocean Mode)
If you do happen to find yourself farther than normal with only a Roam plan or less, your basic Starlink plan does have what they call an “Ocean Mode” toggle. (This was previously called “Global Priority Data”, which I guess suggests it ended up being mostly relevant to open waters.)

If you are out in the water and you get the message on the Starlink app that you don’t have coverage anymore, try toggling this on. It will pretty much immediately give you the priority data speeds of Maritime for as long as you have it on.
But it comes at a price. Ocean Mode charges you $2 per gigabyte you use. If you’re using a phone or tablet, make sure “low data mode” is toggled ON, otherwise apps will be draining data in the background, making Ocean Mode even more expensive.
And don’t forget to turn it off as soon as you are able!
Key takeaways for Offshore Use
Starlink remains functional and useful well beyond coastal waters, though expectations (and budgets) should be adjusted as you move farther out.
| Ocean Mode (Roam) | Maritime | |
|---|---|---|
| Offshore Use | On-demand | Always on |
| Billing | Pay per GB | Monthly tiers |
| Priority | High (temporary) | Highest (consistent) |
| Best For | Occasional trips | Full-time offshore |
How to Mount Your Starlink Safely to Your Boat
Regardless of which setup you ultimately go with, it’s best to not toss your Starlink in the corner and hope for the best — especially if you need it on the roof for better signal.
You’ll find plenty of videos online for ways to MacGyver random hardware pieces together to bolt your Starlink Mini or Standard Starlink to your boat. (You do you.)
While a lot of those kinds of videos have super great insights that I couldn’t recommend watching more, you should be relieved to learn you don’t have to rig anything together, because there are already ready-made devices that will safely strap your Starlink to your boat instantly. No drilling or rigging.
Starlink mounts for boats

Getting optimal signal for your Starlink on a boat is the same as with anywhere: you need an unobstructed 360-degree view of the sky from the dish.
That sounds easy for a boat. And in some cases, it is! But many boaters don’t even have to use their imaginations to realize it’s not always so simple.

For example, a ton of small boats have hardtops or T-tops which block a full view of the sky from below, and feel scary if you were to place your Starlink on top. Sailboats are another prime example; they create massive shadows with their mast, which makes getting unobstructed views range from inconvenient to impossible. Not to mention, you know, rain, water, and clouds.
So the key is to mount your Starlink exactly where the signal is best. But how?
There are veteran Starlink mount designers like TRIO that sell heavy-duty mounts to keep your Starlink safely in place and protected while moving fast, in heavy rain, or other typical boating scenarios.
The Mini Speedmount

The Starlink Mini Speedmount is safety tested for speeds of up to 120mph, keeping your Starlink completely fine (unless you’re James Bond in a very high-speed chase).
You just need to tighten the screws around your Starlink dish, and that’s it! There is room for any cables you’ll need underneath the mount.
Depending on the type of boat you have, you can attach it with heavy duty suction cups, though magnets may be enough in some circumstances.

Protip: Still can’t get signal on the main hull? If you need to get your Starlink on, say, the side of your boat, or at a weird angle, there are accessories for that too!
Professional grade swivel attachments can connect to your mount’s magnets or suction cups, allowing you to achieve even more angles. (Test the signal rigorously all around the boat, because nowhere is necessarily off limits if you have these… unless it’s underwater.)
(Maritime Flat High Performance) Speedmount

If you do have the Maritime Performance grade Starlink, we've designed a specialty Maritime Flat High Performance Starlink mount for that too!
Install is quick, just like on the Mini Speedmount: you just need to tighten the Maritime mount around the dish, and then apply any connection attachments to the bottom you might need for your particular set up.
Keep in mind that just like with the standard Starlink model, you will likely need a power inverter, since it requires AC power.
Starlink Mini Interior Mount

If you have a cabin roof on your boat with some sort of interior glass surface (yes, even a curved pane!), you can often mount your Starlink Mini quickly and easily from the inside, too.
You should definitely test your Mini’s reception on the Starlink app through the glass ahead of getting a mount like this, but if it works, it’s one of the simplest, most low-profile options on the market.
And again, no power tools necessary! Check the specs on our new interior Starlink mount for a quick way to attach your Starlink Mini to the underside of your cabin roof.
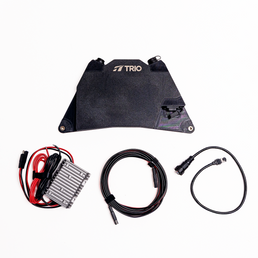
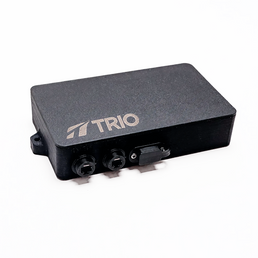
Gen 3/4 All-In-One 12V Conversion Attachment

Our 12V Conversion Attachment can help a lot with the power consumption problems with remote batteries on boats.
The All-In-One has a built-in wifi router, so you wouldn’t even need the included OEM Starlink Router. Just do the following:
- Bolt the TRIO All In One to your TRIO Speedmount
- Connect TRIO Power Supply (Included) directly to 12v/24v, and the other end to the All-In-One
- You’re good to go!
Bottom Line for Putting a Starlink on a Boat
At the end of the day, you need to account for these main things when using your Starlink on a boat:
- Energy consumption
- Wind exposure
- Movement speed
- Clear sky view
For most people, a Starlink Mini with a professional Mini Speedmountis perfect for achieving all of those things.
In some cases, especially for cruises or actual oceanography, a Performance Starlink with a Maritime Performance Speedmountis best.
You may even decide a Standard Starlink with a regular sized Speedmount works for your nice-size rig. (Party at your place!)
And there are also converters, interior mounts, magnets, and lots of other considerations! The great news is that something is totally doable, very safe, and incredibly easy if invested in properly. There are even professionals you can talk to that can help, if you have any questions. They’ve seen it all.
Have fun, and bon voyage!


