


You finally did it. You got the Starlink Mini.
It arrived smaller than you expected, lighter too. The Starlink Mini is about the size of a hardcover book, and for a minute, you just held it and thought: this tiny thing is going to give me internet in the middle of nowhere.
Then reality sets in. Where do you put it? How do you attach it without drilling holes in a roof you've spent good money protecting?
That's what this guide is for. We'll walk you through everything: the right plan, the right location, and the right way to mount the Starlink Mini on your RV roof without touching a drill.
TL;DR
-
The Starlink Mini is the best travel dish available right now, and the Roam plan starts at $50/month with no contract
-
Steel roof: use Rubber Coated Magnets, repositionable, scratch-free, no drill
-
Fiberglass or aluminum roof: use VHB Landing Pads for a permanent hold, or VHB Magnet Discs in conjunction with Rubber Coated Magnets if you want to keep flexibility
-
Any surface: Heavy Duty Suction Cups work almost anywhere and hold over 60 lbs each
-
Add a polycarbonate face cover to the Mini Speedmount for extra protection on the road
-
Run your cable through the wet bay port or slide seal, or door jam,b no drilling needed
Why the Starlink Mini Works So Well for RV Travel
Good choice, by the way.
The Mini is about half the size and weight of the Standard dish, and it has a built-in Wi-Fi router. That means no separate router box to find space for, no extra cable to manage. Just the dish, a power cable, and you're online. It also draws significantly less power than the Standard, which matters when you're running off solar or a battery system.
The tradeoff is bandwidth. The Mini won't match the Standard dish in peak speeds. But for working remotely, streaming, video calls, and staying connected on the road, most RVers never notice the difference. A note on the Roam plan, and why now is a good time:
The Starlink Roam plan was built for exactly this use case. No fixed address required. You can take your Mini anywhere Starlink is authorized, set it up in minutes, and be online. It currently runs:
-
$50/month for 100GB of data, more than enough for weekend trips or casual use
-
$165/month for unlimited data, the choice for full-timers and remote workers
-
$5/month standby mode, for seasonal users who don't want to pay full price when the rig is parked
There's also a 30-day return window, so if it doesn't work for your situation, you can send it back.
The Roam plan has no long-term contract. You cancel when you want, reactivate when you're ready. For RV life, that flexibility is the whole point.
For a full breakdown of every Starlink plan and what each one actually costs, read: Understanding Starlink Pricing and Plans
Where to Mount the Starlink Mini on Your RV
Before anything gets attached, spend five minutes finding the right spot. It matters more than most people expect.
Best locations:
The sweet spot on most RVs is just behind the rooftop A/C unit. That position gives the dish a natural wind buffer at highway speeds, reduces aerodynamic drag, and still leaves a clean line of sight to the sky in most directions.
If your rig doesn't have a rear A/C or you need flexibility, the flat center section of the roof works well. Avoid the very front of the roof. Wind exposure there is maximum, and the dish takes the full force of highway driving.
Use the Starlink app before you commit:
The Starlink app has a sky obstruction checker built in. Open it, hold your phone up at the mount location you're considering, and it will tell you how much of the sky is clear. Do this before you attach anything. A few extra minutes here will save you from repositioning later.
What to avoid:
-
Directly over slide-outs (the cable creates problems when the slide moves)
-
Near the front edge of the roof where wind is highest
-
Close to trees, awning arms, or vent stacks that block sky view
How to Mount Without Drilling: Your Four Options
This is where most guides lose people. They assume drilling is the only real option, or they give you one-size-fits-all advice that doesn't match your actual roof.
Your RV roof material determines your attachment method. Here's how to think through it.
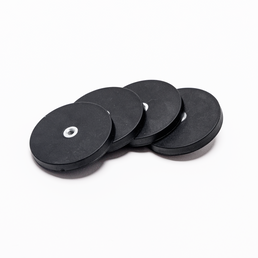
Option 1: Rubber Coated Magnets (For Steel Roofs)
Best for: Steel-roofed RVs, trucks, and any metal surface
If your RV has a steel roof, magnets are the cleanest no-drill solution available. TRIO's Rubber Coated Magnets are built to hold through everything the road throws at them and tested for high-speed travel. The rubber coating protects your paint and roof surface from scratches, so there's no damage underneath even after months of use. And because they're fully repositionable, you can lift the dish and move it in seconds. Whether you've pulled into a site covered by trees and need a better angle, or you simply want to try a different position on the roof.
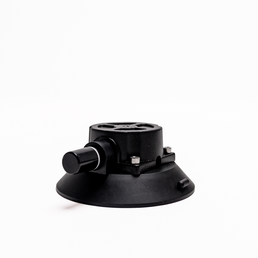
Pair them with the TRIO Mini Flatmount for a low-profile, travel-day-ready setup, or the Mini Speedmount if you spend a lot of time moving at highway speeds. The Speedmount wraps around the dish aerodynamically and significantly reduces wind drag on the road. If you want maximum protection, you can also add an optional 4.5mm polycarbonate face cover to the Speedmount, which shields the face of the dish from debris, branches, and anything else the road throws at it.
Limitation: Magnets only work on magnetic surfaces. They will not adhere to fiberglass or aluminum roofs.
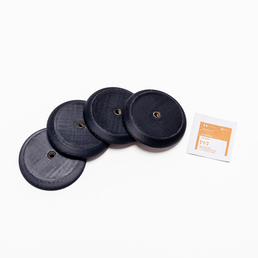
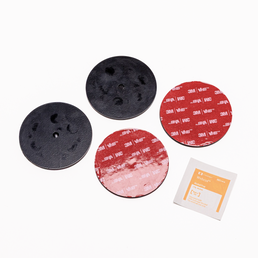
Option 2: VHB Adhesive Landing Pads (For Fiberglass and Aluminum Roofs)
Best for: Fiberglass RVs (most common), aluminum, composite surfaces
VHB (Very High Bond) adhesive is the same technology used in aerospace and automotive manufacturing, and TRIO uses genuine 3M VHB 5952. TRIO's VHB Landing Pads create a permanent, weatherproof base on your roof that the Mini Flatmount or Speedmount snaps directly into. They are incredibly strong and hold up through heat, cold, vibration, and rain without loosening.
This is the go-to setup for fiberglass rigs. It looks clean, it's invisible from the ground, and it creates an OEM-like finish that serious RVers appreciate.
Limitation: VHB is permanent. It can be removed with heat and the right tools, but will likely damage the surface it’s applied to. It is not designed to be repositioned regularly.
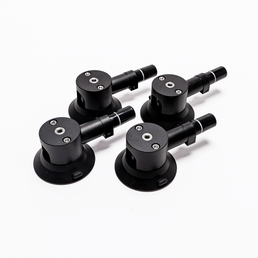
Option 3: Suction Cups (For Almost Any Surface)
Best for: Any smooth surface: skylights, fiberglass, metal, plastic, glass, and everything in between
TRIO's suction cup options, including the Heavy Duty Suction Cups, give you a secure, no-drill mount that deploys in minutes and comes off cleanly. Each Heavy Duty Suction Cup holds over 60 pounds of force, so the dish is locked down. The real advantage here is versatility: suction cups work on nearly any smooth surface, which makes them a go-to for boaters, RVers, van builders, and anyone moving the dish between multiple platforms.
Limitation: Suction cups require a quick check every other day to make sure they haven't lost any hold. Temperature changes and surface conditions can affect suction over time, so a 10-second press-test before you move camp is a habit worth building.
Option 4: VHB Adhesive Backed Magnet Discs + Rubber Coated Magnets (For Fiberglass and Aluminum Roofs That Want Magnetic Flexibility)
Best for: Fiberglass and aluminum roofs where you want the repositionability of magnets without drilling
This is the best of both worlds. TRIO's VHB Adhesive Backed Magnet Mounting Discs bond permanently to non-magnetic surfaces like fiberglass or aluminum using industrial 3M adhesive. Once cured for 24 hours, the Rubber Coated Magnets snap onto the discs and hold with the same grip they would on a steel roof, secure, scratch-free, and fully repositionable between disc positions.
It's the setup for people who have a fiberglass RV but want the option to move the dish, adjust the position without any tools, or snap it off entirely when not in use.
Limitation: The magnets can only be placed where the VHB discs have been installed. Plan your disc placement carefully before you bond them down, because that's where your mount will live.
Step-by-Step: Installing with Rubber Coated Magnets (Most Common Setup)
If you're on a steel roof and ready to go, here's the full install:
What you need:
-
TRIO Mini Flatmount or Speedmount
-
TRIO Rubber Coated Magnets
-
Your Starlink Mini
Step 1: Clean the surface
Wipe the roof area with a damp rag. This ensures that debris doesn’t scratch the surface. The magnets hold dozens of lbs of force, so anything between them and the installation surface will be squeezed tightly.
Step 2: Position the mount
anything, place the Mini in the mount and take a quick sky check with the Starlink app. Confirm the view is clear.
Step 3: Attach the magnets
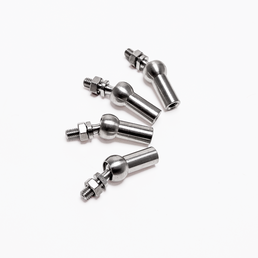
Slide the TRIO Rubber Coated Magnets into the mount base. You'll feel them click down firmly onto the steel surface. Test the hold by gently tugging the mount. It should feel planted. All 4 magnets should be flat on the surface. If the magnets aren’t flat, check out the swivel mounts.
Step 4: Snap in the Mini
Seat your Starlink Mini into the mount. The dish clips in and sits flush, with no exposed hardware or sharp edges.
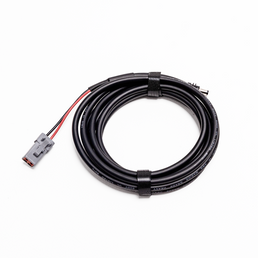
Step 5: Route the cable
Run the power cable along the roofline toward your chosen entry point. Use cable clips to keep it tight against the surface. A loose cable can whip in the wind at speed and wear against roof edges over time.
That's it. The whole install takes about 20 minutes the first time, less after that.
Getting the Cable Inside Without Drilling
Once the dish is mounted, the cable still needs to get inside. Here's what to look for before you consider cutting any holes.
The wet bay/utility bay port: Most RVs have a small existing port in the wet bay for fresh water hose pass-through. The Starlink cable fits alongside it cleanly in many rigs. Check here first. It's an existing hole, zero new damage.
The slide seal gap: With your slide-out extended, there's often a small gap in the rubber gasket at the top or bottom corner. The Starlink cable is thin enough to pass through this gap in many cases. This works well for stationary setups or fair-weather use; it's not fully weatherproof, but it gets you connected without touching a drill.
The power cord entry: Many RVs have an entry point near the shore power cord inlet. If there's slack in the existing seal, the Starlink cable can often be routed through the same opening.
One tip that saves headaches: Route the cable to where it crosses the roofline edge and secure it with a clip or piece of cable lacing. A loose cable flapping on travel day will eventually wear through. Secure it once, and you won't think about it again.
The Right Mount Makes the Rest of It Easy
At $249, the Starlink Mini is genuinely one of the best deals in travel tech right now. Satellite internet that fits in a backpack, built-in Wi-Fi, low power draw, and the ability to work from anywhere Starlink reaches. The capabilities are remarkable for the price, and it's hard to think of a better time to get into it.
But it's only as good as what's holding it to your roof.
A dish that shifts on travel day, vibrates loose over time, or sits in the wrong position means dropped calls, interrupted work, and frustrated camping trips. The mount is the foundation of the whole setup.
TRIO builds mounts specifically for RVs, vans, trucks, and boats, with attachment options for every roof type. No drilling required.
Shop VHB Adhesive Backed Magnet Mounting Discs →
Want to learn more about choosing the right attachment for your specific setup? Read: How to Choose the Right Mounting Attachment for Your Starlink: Home, RV, or Boat


